
I’ve created this page since I started by setting up Home Assistant on 7 Jan 2018 and realised, although it is not very difficult to set up, there are a number of things I had to learn as a newbie. Most people are impatient to get going and would like to avoid some pitfalls and not spend too much time searching for the next block of information somewhere. So hopefully my journey as a newbie here will also benefit others. I don’t aim to make this page a general guide, so it will be focussing on how I went about it and what devices I am using. In many cases, the devices I’m using are available locally in South Africa, so this may be of specific interest to South Africans who are challenged with lengthy import delays.
Due to a shortage of available Raspberry Pi’s for my various projects, my HA fell into disuse. But I have recently started using it again from August 2022, and now have it running in a Docker container at home (no more competition for Pis!). Watch a video I did about this installation at https://www.youtube.com/watch?v=dlvlhou70VA.
- WHY HOME ASSISTANT?
- A HELICOPTER VIEW OF THE SYSTEM
- HOW TO GET THE BASIC SYSTEM RUNNING
- HOW TO EDIT CONFIG FILES
- SETTING UP SSL REMOTE ACCESS
- SHOW GOOGLE MAPS AS A CARD
- FLASHING SONOFF SWITCHES TO WORK WITH HOME ASSISTANT
- FLASHING SONOFF POW SWITCHES
- WHETHER TO FLASH YOUR SONOFF’S FIRMWARE OR NOT?
- HOW I GOT GOOGLE HOME TO CONTROL MY DEVICES BY VOICE
- SNAPSHOT BACKUPS
- IF HOME ASSISTANT WON’T START
- MY SOURCE CODE
- WHAT IS WORKING
- BUSY WITH
WHY HOME ASSISTANT?
There are quite a few expensive ready to use home automation products on the market but the downsides usually are:
- they firstly prefer their own products over others
- you have no control over what other devices they will support in future
- many are propriatary so if they go out of business, so does your smartphone
- many only provide their cloud hosting as an option, so your Internet is offline, so is your home
Home Assistant is an open source and free product which means anyone can see how it works, and has many community followers have already added numerous devices themselves. If you can’t code yourself, many developers out there love a challenge and often there will be someone that will do the coding. Another nice thing about these types of contributions is that other users have some great ideas that they suggest and you end up finding far more enhanced functionality than the default software you get with the original devices.
To be honest I did not do a full market comparison around all possible home automation products (there is also free OpenHAB). The choice happened more back to front in that I was searching for something to notify me whether my garage door was left open or not (like a tilt sensor) and I started noting really cost effective ideas around this like OpenGarage and I noticed it had support within Home Assistant. Then I saw Home Assistant supported IFTTT and Pushbullet (always good signs) and even the Efergy power monitor that I have. Since installing a soloar system at home, HA’s ability to work via MQTT and Modbus TCP protocols were also a bit plus. When I looked at its demo site I was already getting hooked. Seeing it only needed a Raspberry Pi (or run it in a Docker container) to get going I thought I have nothing to lose by just trying it out. So here I am, the following day, and I have the basic system running with some services hooked in.
A HELICOPTER VIEW OF THE SYSTEM
This is a web service that runs headless (needs no monitor at all even for installation) on a Raspberry Pi computer with either Wifi or Ethernet connectivity to your router in your house. Once the basic system is installed I had a dashboard view that had detected my Chromecast, Google Home and Google Home Mini speakers. It also had Google Assistant operating but it was not detecting any sound. From this point on you can install various components (Integrations) and configure them. Usually the recognition of the device takes place from code (you copy-and-paste the code and then set a few details like a username, password, an API key, etc) in the main configuration file named configuration.yaml which is found in the /config directory on the Raspberry Pi server (but more on that later).
HOW TO GET THE BASIC SYSTEM RUNNING
I had a Raspberry Pi 2 with a 32GB Micros SD card which I used, and I followed these instructions. I followed the route for using the Hass.io image with Etcher and Visual Studio Code (I’m using a Linux desktop but everything should run on Windows or Mac too – the advantages of cross-platform software!). Follow the instructions to download the image and flash it to the SD card using Etcher. Connect the Pi to an Ethernet cable and just boot it up and wait a good 20 to 25 minutes.
I had hooked up a HDMI monitor to the Pi, and it initially displayed there, but soon went blank and actually appeared in my desktop’s browser tab at http://hassio.local:8123, or the Pi’s IP address like http://ipadddress:8123. So I would not bother again at all with connecting a monitor or a keyboard, as there is nothing you have to do on the Pi at all.

And after 25 minutes or so this was the default screen (viewed in the browser) where it had two sensors at the top and the cards showing my Google Home and Chromeast devices.

HOW TO EDIT CONFIG FILES
NB: The info below was for my older version of Home Assistant, so it may differ a bit now.
First, install the suggested add-ons from the following page. Just note though that where the instructions say “Click on the menu icon in the top left and select Hass.io in the sidebar”, by default that sidebar on the left side is hidden. If so, clicking on that hamburger icon (3 bars) on the top left of the screen will reveal the left side sidebar. You will then see the Hass.io menu option further down. Once you have clicked on the Hass.io menu option, you will see the little shopping bag icon on the top right. The list will show the Built-in Add-Ons and you can click on the Configurator one (will allow you to edit config files directly in the browser), and then click on Install. Also, see this information about the Configurator component at https://home-assistant.io/docs/ecosystem/hass-configurator/. The settings for this component can all be done in its setup screen in Hass.io and no need to actually edit a separate config file for it as was the case in earlier versions. Key settings are locking down allowed IP addresses or a range, a user name and password, and setting limits for banning IP addresses for incorrect logins.
For editing main configuration files (these are plain text-based files stored in the /config folder on the Raspberry Pi running Hass.io) I did not understand how to use the Configurator add-on at first but I see now it is a lot easier than using the Samba share method. So here are the steps to use the Configurator add-on to edit the configuration files.
Open the left sidebar if it is not open (by clicking on the hamburger icon top left)
- Click on Configurator menu
- In the window that opens there is a file icon (top left of that window) and if you hover your mouse over it the pop up will say “Browse Filesystem”. Click on it.
- By default, it should be in config/ (shown just to the right of the <- near top. Otherwise click that <- to go back to the root directory and find the config directory.
- The list of files below it should show configuration.yaml if you are in the correct directory.
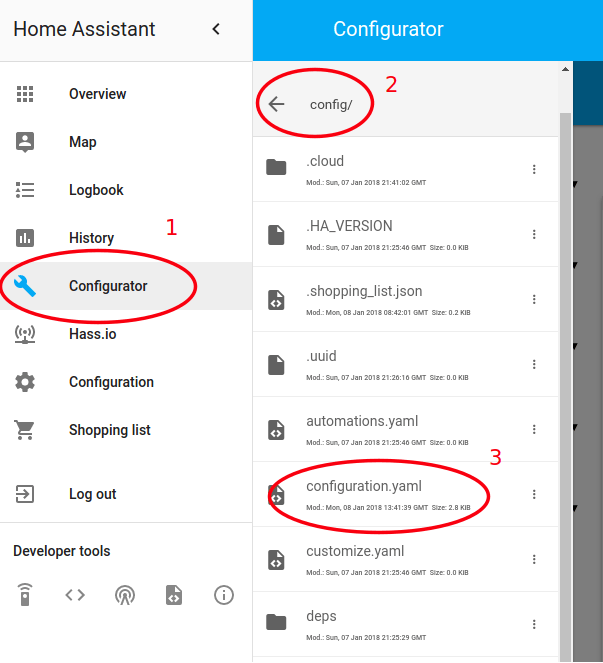
- Click on the filename you want to edit eg. configuration.yaml, and it will open up on the right side. Click in that view to start editing.
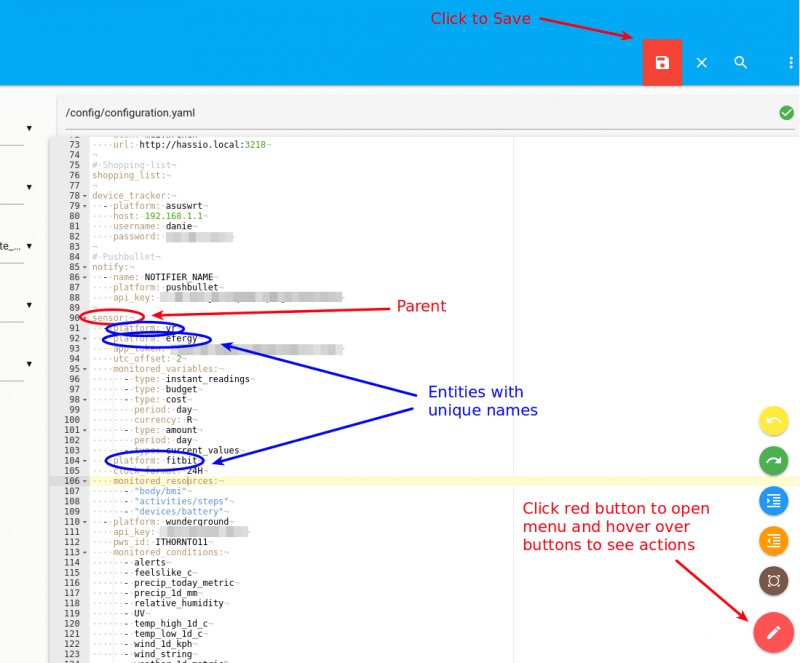
- Shown above is Style 1 from the more detailed information about YAML syntax at https://home-assistant.io/docs/configuration/yaml/ (and for the format of how devices are listed at https://home-assistant.io/docs/configuration/devices/). Note how each sensor entity has a unique name preceded by “- platform:” just before it. You need to pay careful attention to whether a value should be enclosed in “parenthesis” or not. Format is crucial otherwise the entity will just not appear. I also saw somewhere that you should not insert tabs to indent as this uses Ruby formatting and it should rather be two spaces. But the pop-up menu at the bottom right of the screen will do an indent for you.
- To leave the edit view you can either click on the red icon to save (top right), or the X to lose the changes and not save.
- But your changes won’t be active yet. Go back to the left sidebar and click on the Configuration menu.
- Then click on the “CHECK CONFIG” button to check for errors (should show a green “Valid!” message), and then the “RELOAD CORE” button to load the changes. If your changes did not show after clicking on the Overview menu, then come back to the Configuration menu screen and click on “RESTART” under Server Management (you’ll have to wait a few minutes though before your pages will load.
SETTING UP SSL REMOTE ACCESS
- Watch this bit of video, if you have Hassio installation, as it gives you the overview around the Let’s Encrypt and the DuckDNS add-ons (Note the DuckDNS add-on now states you do not need the Let’s Encrypt add-on any longer if you use DuckDNS as DuckDNS has Let’s Encrypt built-in). The former add-on helps obtain and generate the SSL keys and the latter is needed if you do not have a static IP address from where you are running your Home Assistant server (eg. if you access the Internet via LTE or ADSL you usually get a dynamic IP address). I’ve also done a video myself at https://www.youtube.com/watch?v=DZRG2sezIl4 about how to host securely at home.
- I kept finding the options for the two add-ons were greying out the save button, and it all comes down to formatting and syntax again. The e-mail address, as well as domain name address, must be in “quotes”. So where you see null, you need to add the quotes for the information you put in.
- Here is the step-by-step directions for Let’s Encrypt (if you still need to use it):
- install the addons letsencrypt
- setup configuration.yaml – don’t change anything
http:
ssl_certificate: /ssl/fullchain.pem
ssl_key: /ssl/privkey.pem - open the port forwarding 443:443 and 80:80 on your router
- fill the options on the letsencrypt
{
“challenge”: “https”,
“email”: "[email protected]",
“domains”: [
“sample.duckdns.org41”
],
“certfile”: “fullchain.pem”,
“keyfile”: “privkey.pem”
} - click “save”, then you must be able to “start” the addons
- Start the “SSH Server” addons for the troubleshooting and other addons as well to prevent error after restarting homeassistant
- restart homeassistant
- setup your port forwarding 443 to internal port 8123 on your router
- you must be able to access your https://sample.duckdns.org
SHOW GOOGLE MAPS AS A CARD
I found this snippet of code to add to your main config file which displays the location of a device on a Google Maps card. The only part I modified was adding my own devices name (ie. danie_taimen), as recognised by Home Assistant and fond in the known_devices.yaml file
# Shows a Google Map with device's location from Owntracks
camera:
  - platform: generic
    name: Danie Location
    still_image_url: https://maps.googleapis.com/maps/api/staticmap?center={{ states.device_tracker.danie_taimen.attributes.latitude }},{{ states.device_tracker.danie_taimen.attributes.longitude }}&zoom=13&size=500x500&maptype=roadmap&markers=color:blue%7Clabel:P%7C{{ states.device_tracker.danie_taimen.attributes.latitude }},{{ states.device_tracker.danie_taimen.attributes.longitude }}
    limit_refetch_to_url_change: true
FLASHING SONOFF SWITCHES TO WORK WITH HOME ASSISTANT
What a mission! It should have been simple but cost me 2,5 days in the end. The short of it was the problem was likely with my network routing and not the Sonoff or the firmware, but once you are fixated on where you think the issue is, you waste time. When I realised I was actually getting “host unreachable” pings I realised it was my router and I removed the allocated DHCP and rebooted the router and there it came up fine.
I also had a lot of compile errors on the Arduino IDE and that was largely from following old videos where things have got simpler. I won’t go into how I downgraded the versions all to match the videos and even resorted to using Windows. It flashed but that was not where the problem lay.
So the outcome, in the end, was the Tasmota developer himself (Theo Arends) responding to a problem I posted on his Github forum (the absolute wonders of open source software) and he pointed me instead to his Wiki which is way way simpler and works with all the up to date versions. The Wiki is at https://github.com/arendst/Sonoff-Tasmota/wiki/Arduino-IDE. The only thing was Linux was blocking the Arduino IDE from writing out to the USB port, and all I had to do for that was issue “sudo chmod 666 /dev/ttyUSB0” from the command prompt to allow write permissions. And the flashing took all of 4 minutes or so.
The Sonoff switch is connected now and is communicating over MQTT to the Home Assistant dashboard. Later the same day I had Google Home Devices reconnected to my Home Assistant, and now we can turn the fan on or off from Home Assistant (locally or from anywhere) and from Google Home by speaking via the Google Home speakers. I was wondering for a while why it kept saying it did not know which fan, and then I realised I had not deleted the other fan in the same bedroom. Another nice perk with the new function added a year back, is that Home Assistant will also poll and detect whether the fan is actually online for use, and whether it is on or off.
This is how I defined the switch in the configuration.yaml file:
switch:
  - platform: mqtt
    name: "Fan"
    command_topic: /sonoff2/power
    state_topic: "stat/sonoff2/POWER"
    qos: 1
    payload_on: "ON" payload_off: "OFF"
    availability_topic: "/sonoff2/LWT"
    payload_available: "Online"
    payload_not_available: "Offline"
    retain: true
This works as is, to switch its status between on/off, and the availability topic keeps track of whether it is actually online and available. “Name” is the arbitrary name you are going to call it, and “sonoff2” in this case is the project name used when I flashed the firmware (this is a unique name or ID you define for each different switch or device you are flashing.
FLASHING SONOFF POW SWITCHES
These switches not only switch on and off any device (up to 16A of current) but will also measure instant power draw. This is useful as you could set alarms for high current draw, a current draw that runs too long, or even an alarm to go off after the current draw stops. I’ve had some challenges with these switches though. Firstly it related to bad solder joints I made (for some reason the metal on the board was not allowing the solder to stick) and secondly the firmware looked like it flashed but the device’s webpage was not showing (latter was needing a change to the Arduino IDE settings (IwIP Variant: “v1.4 Prebuilt”). Once this all got going I did also change the telemetry from 300 secs to 30 secs so that HA picked up the power readings a little more often (in devices webpage go to Configuration -> Configure Logging -> Telemtery Period).
In the configuration.yaml file I defined a switch (to switch on and off) and also the sensors that needed to show:
switch:

- platform: mqtt

  name: "Washing Machine"

  command_topic: "cmnd/sonoff1/power"

  state_topic: "stat/sonoff1/POWER"

  qos: 1

  payload_on: "ON"

  payload_off: "OFF"

  availability_topic: "tele/sonoff1/LWT"

  payload_available: "Online"

  payload_not_available: "Offline"

  retain: true
And for the sensors:
sensor:
  - platform: mqtt
    name: "Washing Machine Power"
    state_topic: "tele/sonoff1/SENSOR"
    qos: 0
    unit_of_measurement: "W"
    value_template: '{{ value_json["ENERGY"]["Power"] }}'
  - platform: mqtt
    name: "Washing Machine Current"
    state_topic: "tele/sonoff1/SENSOR"
    qos: 0
    unit_of_measurement: "A"
    value_template: '{{ value_json["ENERGY"]["Current"] }}'
  - platform: mqtt
    name: "Washine Machine Today"
    state_topic: "tele/sonoff1/SENSOR"
    qos: 0
    unit_of_measurement: "kWh"
    value_template: '{{ value_json["ENERGY"]["Today"] }}'
  - platform: mqtt
    name: "Washine Machine Yesterday"
    state_topic: "tele/sonoff1/SENSOR"
    qos: 0
    unit_of_measurement: "kWh"
    value_template: '{{ value_json["ENERGY"]["Yesterday"] }}'
Note also now HA has an add-on that will detect and help manage these switches after you’ve flashed the Tasmota firmware onto them.
WHETHER TO FLASH YOUR SONOFF’S FIRMWARE OR NOT?
Well, these are the pro’s and con’s as I have witnessed first hand now:
| Factory Software | Tamora Firmware |
|---|---|
| Uses eWeLink mobile app – very easy | Can use 3rd party app like Blynk |
| Mobile app can set schedules, loops, timers | You lose this but you can set manually in Home Assistant. |
| Limited to what is in the mobile app | Home Assist can configure very detailed conditional triggers and combinations of triggers. Standard Sonoff switches will not connect to Home Assistant (only to their cloud service in China). |
| App works via proprietary cloud service to operate | Your device talks locally to a MQTT broker on your own network |
| No webserver login to device | Has webserver login with detailed configuration settings including customised use of the onboard button |
| N/A | Bit more complex to flash the firmware |
| If cloud provider goes bust service stops | Service continues regardless on your own network |
| Connects to Google Home via the eWeLink app | Connects to Google Home by linking Home Assist to a Google API |
HOW I GOT GOOGLE HOME TO CONTROL MY DEVICES BY VOICE
No long story here. The announcement at https://www.home-assistant.io/blog/2018/04/24/launch-google-assistant-support/ explains the support is now built-in, and how to configure it. I had some confusion when Google kept asking me which fan. I realized a bit later I had not unlinked the previous fan that I had set up with the standard Sonoff software and the eWeLink app. I saw that in fact I had two fans named “fan” in the bedroom. After unlinking the other one it works fine now just saying “Hey Google turn on the fan” or “turn off the fan”.
I did also specify to Google Assistant that my device called “switch.fan” (switch being the type of device and fan the name I gave it) that it should be referred to by the name “fan”. So in the configuration.yaml file, under the section “homeassistant:” under the “customize:” section I added this segment of code:
switch.fan:
  google_assistant: true
  google_assistant_name: fan
SNAPSHOT BACKUPS
This is pretty important as I discovered at about 3am when doing a final change to my config file and rebooting the server and nothing happened. When I went in with SSH I discovered the config file was 0 bytes and was empty…. Luckily I had just 5 mins prior to that manually copied the whole /config contents to my desktop’s drive so I was able to easily copy the config file back and it booted fine. But it could have been a disaster. So manual backup like I had done was one option.
The other is to create a snapshot version from Home Assistant by clicking on Hass.io on the sidebar menu, and select snapshots. The backups are compressed and saved physically in /backup on the Home Assistant server. You could either manually restore the whole snapshot over everything, or just extract your config file if that is all that is needed. So always make a snapshot before embarking on new changes. These snapshots can also be used to migrate the whole Home Assistant to a new Raspberry Pi.
Very Important and do it now: Once a snapshot has been created with Hass.io, there is also an option to download it. Download your latest snapshot to somewhere away from the Raspberry Pi so that you can easily access it for a full restore if needed. I’ve had a case when the front-end was just not starting up after a HA software upgrade. If you are a Windows user, getting at that backup snapshot on the Pi within the container is not very easy. An offline downloaded snapshot means a full restore is as easy as doing a clean install of HA, then opening and restoring that snapshot, and rebooting and you’re done. Always save a downloaded copy before running any update.
IF HOME ASSISTANT WON’T START
It can take a good five minutes to fully restart so give it some time. You can login via Samba or SSH to the /config directory and open home-assistant.log to see what startup errors have been encountered. Most often it is syntax or other minor issues in the yaml files. I’ve never not been able to login at least to view and edit files from the file manager.
After you have found or made some minor corrections you will want to start Home Assistant up again and see if it fully loads. I have the SSH service running so I login in from a terminal window like this “ssh root@ip_address_of_server”. With the Hassio install you only have limited commands so these will be the useful ones:
- hassio homeassistant start – start up HA
- hassio homeassistant stop – shut HA down cleanly
- hassio help – see other commands you could try
- exit – leave SSH session
MY SOURCE CODE
I have published my HA source code (config files) at https://github.com/Danie10/gadgeteerza-homeassistant and hope this can help others if you’re facing some similar challenges to overcome.
WHAT IS WORKING
- Weather is pulling from Weather Underground and displaying in a card on the dashboard.
- Efergy power consumption stats are showing in a card. Clicking on either the solar or grid entities pops up a history graph for previous 24 hours.
- Speedtest is showing download and upload speeds and the ping time to a local server in my city, set to test every 3 hours. Clicking on an item shows the history of the previous 24 hours performance.
- Presence of devices on the local network is being sourced from running NMap – I have it limited to just show my family’s phones. It shows which phones are present (home) or away (away or battery flat).
- Ring doorbell stats show in a card with battery level, Wifi signal strength, and times of the last movement or doorbell press. Also got it to display the most recent motion video as a card (click to view it).
- Integration with my Victron solar system via Modbus TCP.
- Google Chromecast and two Google Home speakers show up in cards that you can adjust volume levels, see what is playing, pause, etc. You can also type in a text message and it will speak the message to an individual speaker or a group.
- Got Let’s Encrypt SSL working with DuckDNS so I can access my Home Assistant remotely now.
- Got a Sonoff Basic switch flashed with Tasmota firmware and it is communicating via MQTT. It is also linked to Google Home devices so it can be controlled by voice via a Google Home speaker.
- Got a Sonoff POW switch flashed with Tasmota firmware and it is communicating via MQTT. It can be switched on and off from HA, and the power, current, total power for today and yesterday show up on the dashboard.
- Alerts for flat batteries for VoIP phone and Ring Doorbell – I can already monitor these devices as present (present meaning on and connected) on the network, and have push notifications to the HA app on my phone if they go offline.
- Automation alert for when power has ceased to flow for the shower hot water ie. geyser has heated up.
- Have Reolink CCTV cameras integrated.
BUSY WITH
Some ideas I have and what I am currently setting up:
- Groups are clusters of related entities (an entity being a single switch or attribute of say weather, like the wind speed). A View is another tab view on the Home Assist screen, which is achieved by adding a line “view: yes” inside the group.
- Icons are sourced from https://materialdesignicons.com/ and are specified as a line inside say the panel_iframe function or under the customize section for a specific entity where you defined a friendly name, like this: “icon: mdi:wrench” where wrench is the con’s name from the website.
- Want to integrate my Texecom alarm system as well with Home Assistant – my starting point will be here, and Texecom’s own API here.
- Think about facial recognition.
- Find a way to convert a dumb water meter into a smart connected meter using maybe a Hall effect device to read it.
- Use an ultrasonic range detector to read the level of my rain water tank – it has an accuracy if 1mm when >20cm range. The tank is a good 2m high (5,000L) so that last 20cm is not a big issue.
- Look at https://github.com/emoncms/emoncms EconCMS for data logging and visualisation of sensor data.
- Automation of an aquarium – see https://youtu.be/75BGApkBkjY.
- Need to learn more about Templates as they can alter the look and feel of detail on the card groups.
- Watching good tutorial videos by diyAutomate.