Receiver Status
The uptime status is refreshed every 5 minutes.
Introduction
OpenWebRX is a multi-user SDR receiver that can be operated from any web browser without the need for any additional client software. It is the ideal solution to provide access to the radio spectrum at your location of choice to a wide audience.
In other words, for end users, this means you can use your plain web browser (desktop or mobile) to access an OpenWebRx website, and from there, tune in and listen to various radio transmissions that include usually a range of ham radio frequencies, but sometimes also other frequencies (just depends on what the OpenWebRx operator has made available). The end user can be anywhere on the Internet, but the transmissions being heard, originate at the location of the OpenWebRx receiver.
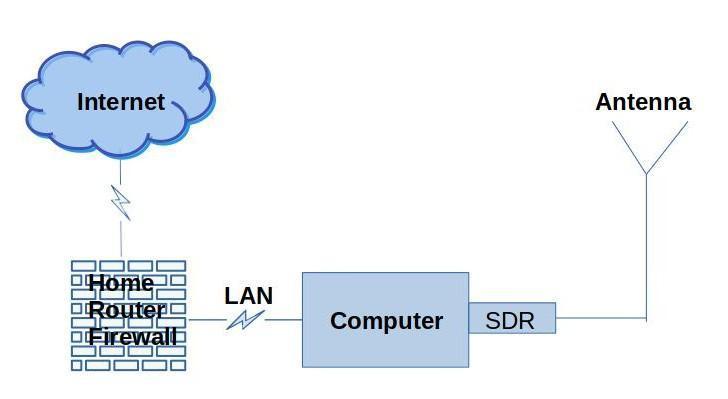
All you need to host such a service is:
- A computer – could be a Raspberry Pi
- An SDR dongle device – this determines the frequency range to be made available
- An antenna (for better reception, as the antenna that comes with the dongle is usually only sufficient for strong signals)
- Network access (to listen from elsewhere in your house, or to share to the Internet).
- Optionally a DVMEGA DVstick 30 or 33 if you want to provide decoded DMR and DStar signals (at $129 though it is pricey)
It allows anyone, worldwide with Internet browser access, to listen to radio transmissions at the location of the receiver. Depending on the OpenWebRx configuration this could be broadcast FM stations, ham radio stations (various modes including digital), two-way radios, APRS, etc. For ham radio digital modes it can decode the signal into audio (DMR, D-Star, YSF, etc) and text (APRS).
This is truly amazing software covering so many modes all-in-one, including also the normal FM, AM, SSB. It actually decodes those various digital modes even identifying the caller identity and locations on a map.
There is more though… apart from just receiving and using it yourself, it can also be configured for remote access listening, not only for yourself If you are travelling say with your mobile phone, but by sharing access over the Internet for others anywhere in the world. You can find some of these OpenWebRx stations listed at https://www.receiverbook.de/. KiwiSDR is another popular alternative to OpenWebRx, and their public stations can be found at http://kiwisdr.com/public/.
In November 2023 I upgraded to the OpenWebRx Plus version which now adds a REC button for recording audio, a map view that shows ADS-B plane locators, a toggle button to show the spectrum display, and a noise reduction button.
Typical Use Cases
- You are not a ham operator, but want to tune and listen to what radio activity is happening. Usually the station has bookmarks (and a waterfall display) for easily finding what frequencies are used for what.
- You do not have a DMR or D-Star digital mode ham radio, but want to listen to this activity at a location and see the digital text that accompanies the transmissions. NOTE: Version 1.1.0 removed this functionality from the software from August 2021 due to these modes being proprietary. If you want to host decoded DMR, you will now need to purchase a $129 DVstick 30 or similar dongle.
- You have an APRS radio or transmitter near that location and want to monitor if the APRS is sending correctly from your equipment.
- You are broadcasting ham radio (or even running a bulletin), a nearby OpenWebRx service could provide a monitor to confirm how your signals and audio are being received.
- You are experimenting with setting up your ham radio and want to monitor what is being received and sent from the local radio repeaters. You can also see on the waterfall what your transmission looks like on the repeater’s input frequency (strength and audio modulation).
- You are travelling away from home and can use this to monitor the radio activity near your home (from any mobile browser, whether on a laptop or mobile phone).
- You are interested in becoming a ham radio operator, and this will allow you to tune in and listen to what activity is happening at this location, including listening to any weekly ham radio bulletins broadcast near this location.
- Listening to air traffic control or marine radio comms (depending on what bands the receiver allows you to listen to).
- Listening to the International Space Station as it passes over the location.
- Your ham radio does not have a waterfall display to show activity across a band, and this can show that activity if you are in a nearby location.
Main Components
Antenna
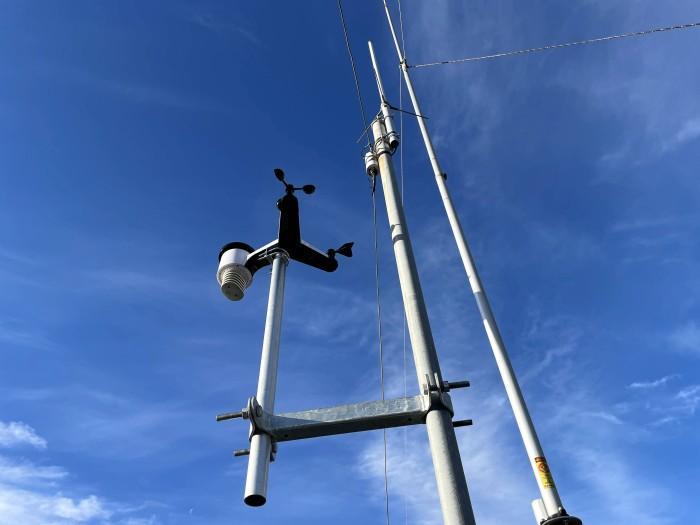
Although many SDR dongles come with bunny ears type telescopic antennas, these are not really sufficient for picking up weaker radio signals, so you ideally want something tuned for the frequency range you intend to monitor. If you want to tune in for HF type signals then maybe a 40 m dipole or something similar could be used, but in my case I was intending to cover the VHF and UHF frequencies, so I used a VHF/UHF vertical antenna (but it could also be a home-brew quarter-wave like have made from plain wire soldered to a female SO-239 panel mount connector that I bought from an electronics shop – but that works better than my commercial vertical, so I use the home-brew antenna on my real radio). The coax from the antenna runs down to the SDR dongle. As I have standard RG-58 coax cable between the antenna and the SDR dongle, I also have a short pigtail adaptor cable converting from PL-259 connector to the SMA connector that the dongle accepts.
Below in the centre, on the main support mast, is my Watson W-30 Colinear VHF/UHF base antenna that I’m using to receive the signals for the SDR dongle.
SDR Dongle
I started out with a real cheap one, so those will work, but paying a bit more got me a RTL-SDR temperature compensated oscillator tuner. So start with what you have, or can afford, and then upgrade later if you need to. Depending on the particular model it could receive frequencies from 500 kHz up to 1.75 GHz. An important factor to consider is the total bandwidth you can provide as the SDR is scanning the bands that you are providing – the wider bandwidth (or spectrum) you want to make available, will mean firstly the SDR dongle has to work a lot harder (slower response and higher temperatures), and secondly you may have to consider what antennas will be matched with that spectrum. All these ‘cheaper’ dongles are 8-bit ADC resolution and the 16-bit ones are a lot faster and scans a wider frequency spectrum (which also means you can provide more or wider bands) BUT they come at quite a premium cost. The sample rate and the ADC resolution determine how much spectrum you will be able to service without drop-outs. Prices start around $20 for the cheaper ones but reasonably good Funcube Pro+ or Airspy or HackRF dongles are going to be $200 to $300.
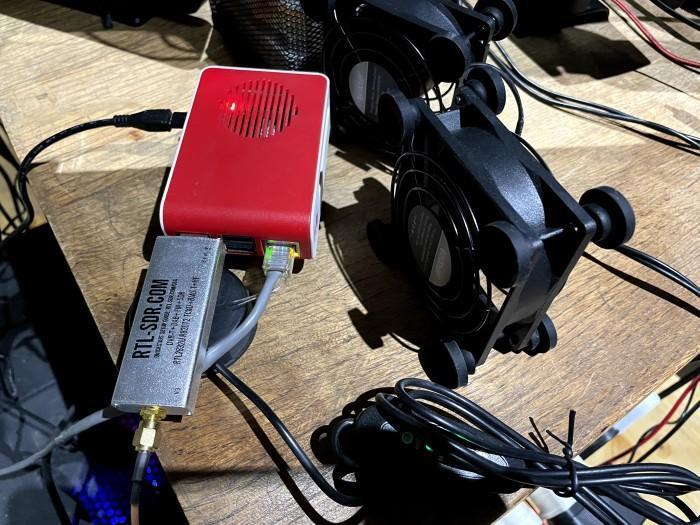
The photo below shows my Raspberry Pi 4 with the RTL-SDR dongle plugged in. Mine was running very hot, so I had bought cheap USB desk fans, but I found they gave up after 6 to 8 weeks continuous running. I then bought the dual case fans you see below, which plug into 5V USB, so they actually plug straight into the Raspberry Pi’s USB port. Computer case fans are designed for continuous running and I think these were rated for 10,000 or so hours, and they have a 3-speed switch.
Computer
This needs to be running the whole time you intend anyone to be using the OpenWebRx, so personally I just think the smallest footprint with lowest power consumption (and cost) is a Raspberry Pi. I’m using a Pi 4 but a Pi 3 will probably work fine. The software comes as a ready to install Pi image, or as a Linux Debian install from their repos, a Docker image (if you want to install on say an OMV server or similar), or you can manually install it from source code. Again for most. the Pi image will be easiest to do by just burning that ISO file to an SD card for inserting into the Pi. The guide at https://github.com/jketterl/openwebrx/wiki/Setup-Guide explains how to do this. You’ll note your Pi can connect via Wi-Fi or by Ethernet cable to your home router, for access by other computers. Ethernet is simpler and more stable, though.
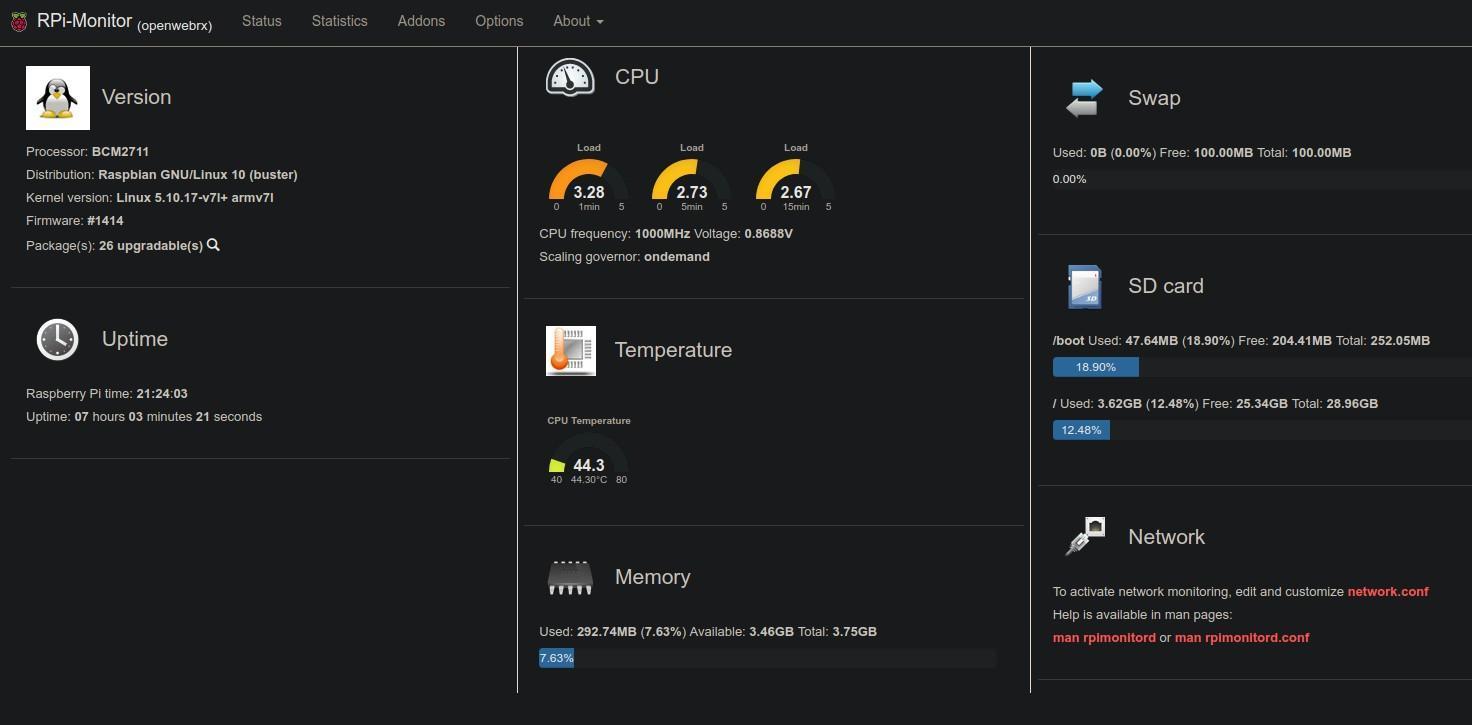
I’m also running utility software called RPi-Monitor on my Pi to keep an eye on the temperature and load on CPU (which I monitor on my desktop computer from one of my browser tabs). The screenshot below shows what that view looks like.
Home Router/Firewall/Reverse Proxy
The setup above is fine for accessing this from inside your home network, but if you want to share it to the Internet you do need to provide a URL address and have some reverse proxy with SSL connection. I use something called NGINX Reverse Proxy which generates the SSL certificate and securely manages the incoming connections by ensuring that they only reach the OpenWexRx on the Pi. I did the video below explaining how I achieved this, and this would also work for home weather stations and similar things you are hosting (see https://youtu.be/DZRG2sezIl4).
DMR Dongle
If you want to decode the proprietary DMR signal then you’ll need to buy a hardware dongle for this, as OpenWebRx had to remove its software decoder due to licensing issues. If you look around you may find forks that still contain the software decoder.
How OpenWebRx Works
I did an introduction video at https://youtu.be/hK-QYrecxVM explaining how the setup works with a tour around the interface for end users. This shows the parts of the screen that you will interact with as a user.
There is also more detailed information about the user interface and controls at https://fms.komkon.org/OWRX/. Not all this functionality is enabled on this receiver though.
Usage Etiquette
This is a shared receiver, so anyone who tunes it by changing the profile (band segment on diagram), is also changing the profile for everyone else. It’s just a limitation of the software/hardware. Right at the bottom of the screen is the Client count and if that shows [1] then you are the only connected user. But if it is [2] or more, then there are others who are already using it. Note that tuning the frequency on that same profile does NOT affect anyone else. Profiles (Band Segments) are changed by using the drop-down menu to, say, switch from 2m VHF Voice to 2m UHF Digital.
If the receiver is tuned to an ongoing QSO or transmission, and the Client count is [2] or more, then it may indicate someone is listening to that transmission. If so, please be considerate before switching profiles.
The scanner can be used on a profile (band segment) without interfering with other listeners. This will scan between bookmarked frequencies on that profile (and segment). To use click on unused frequency on waterfall, left click the SQ (squelch button so it is silent), then right-click on the SQ button to start the scanner. Right-clicking again on the SQ button will stop the scanner.
If you open it with the base URL https://openwebrx.gadgeteerza.co.za/ it will not change the tuning of anyone already listening. You will be tuned to whatever the receiver is currently set to. This is the best etiquette to use, unless you are tuning to say the Wednesday HAMNET bulletin on its specific frequency then the longer link that specifies frequency etc will force the receiver to the Constantiaberg repeater frequency.
The squelch, volume, colour themes, etc are unique to yourself, so those can be changed at any time, and will be remembered by your browser.
Note that on Wednesdays from 17:30 UTC (or 19:30 SA Time) the receiver will often be tuned to the Constantiaberg repeater on 145.700 MHz for the weekly HAMNET bulletin for about an hour. Please do not switch the profile (band segment) during this time. I may also manually disable profile changing during this time slot.
When you have finished using it, please CLOSE your browser tab so that the receiver is free for others to use. If you connected using a link that directly accesses a bookmarked frequency, and your browser tab refreshes, it will keep retuning to that frequency, and will irritate other listeners who may be listening to something else. There is a 90 minute timer set to time out browsers left open on the page.
Listening to DMR – it seems my DMR dongle only decodes for a single user. I thought everyone would still be able to listen, but if there is more than one user, and you see a red websocket error, it may be that only the first listener can actually hear the decoded DMR signal.
OpenWebRx Plus
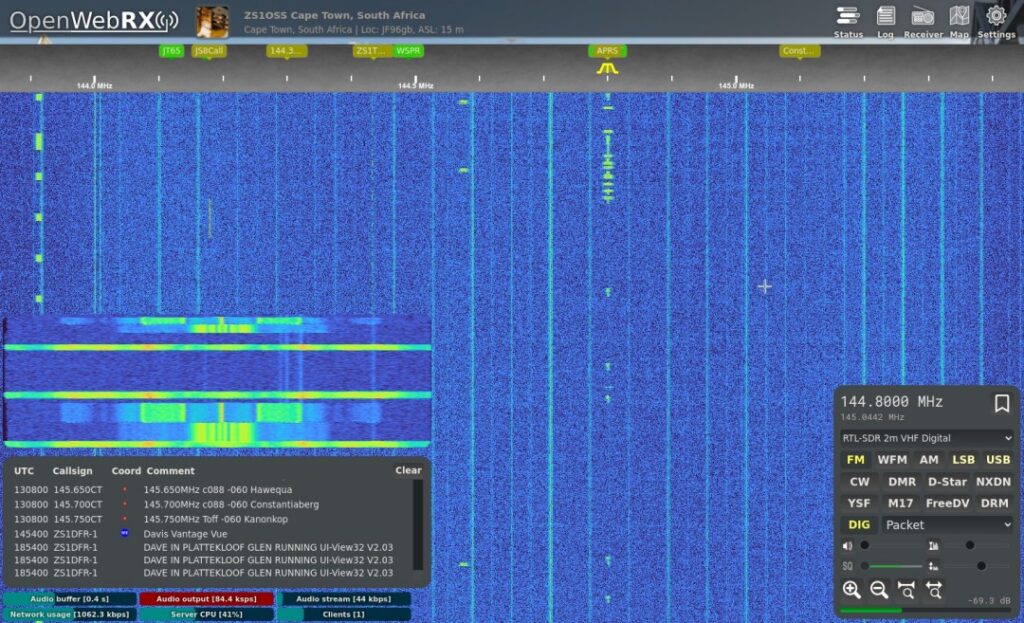
Since around November 2023 I upgraded to the Plus version and screenshot below highlights some of the newer features now available to users:
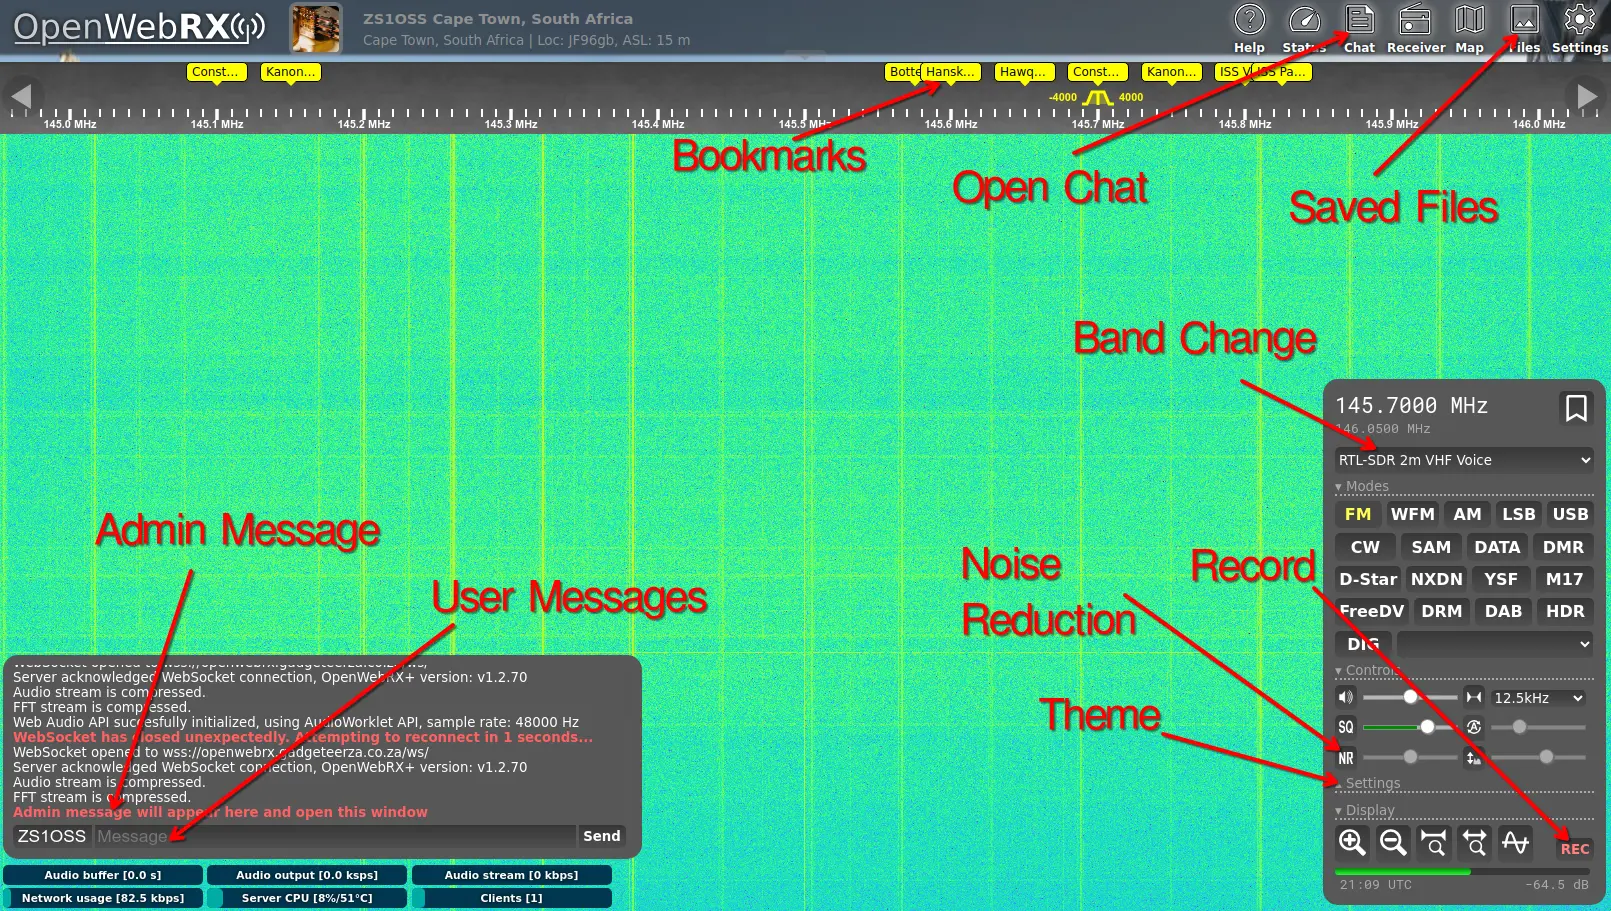
- Admin Broadcasts – will appear in red and typically I’ll use this to notify users ahead of a reboot, or to alert users to some undesirable behaviour. Broadcasts will automatically open the chat window. The recent version now also lets the admin view the IP address of users, and to ban an IP address for a period of time.
- User Messages – users can now specify a name (or callsign) and leave a message for others to see. This will finally allow listeners for a bulletin, for example, to “call in” with their call signs. If the Message Log / Chat window is not visible, click on the CHAT icon, top right, to toggle it.
- Recordings – Pressing the REC button will start a recording and the button will flash red whilst recording. Click it again to stop the recording, and it will prompt you to save the MP3 file.
- Noise Reduction – the NR button will activate noise reduction and the level can be set.
- Themeing – user settings you can select a suitable theme and do some tweaks. This will be remembered by your browser, and does not affect other users.
- Clicking on callsigns, aircraft and vessel numbers, should do a web lookup to identify them.
What you can hear on my Receiver
The following could be interesting to listen to on my station and are all marked with yellow bookmark tags along the top of the waterfall display. Clicking on a bookmark with quickly set the frequency and mode to that bookmarked transmission.
On the right-hand lower part of the screen is a control display which allows you to change the band segment, volume, squelch, mode type, etc. But clicking on the yellow bookmarks tabs should set the mode correctly for you. Don’t be afraid to play with it as it is receive only and won’t damage anything:
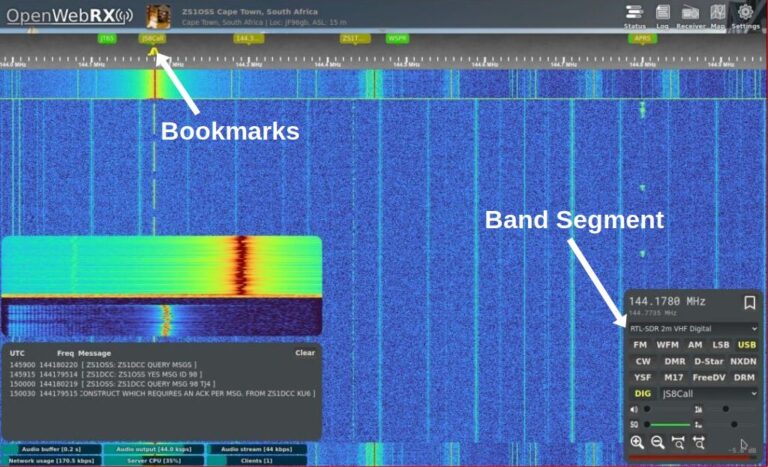
- RTL-SDR 2m VHF Digital
- APRS stations beaconing location information around Cape Town which includes cars/trucks, weather stations, repeaters, etc and displays the data they are transmitting. So weather stations will show weather info whilst cars/trucks will show location, speed, direction, etc. If there is an emergency operation or rescue on, you may see the portable tracker units reporting in via radio.
- There is also an International Space Station (ISS) voice frequency here for when they pass over Cape Town, but you may only hear the astronauts speaking as the uplink frequency is on 145.200 MHz FM.
- 144.300 USB relay for weekly Wednesday HAMNET bulletins at 17:30 UTC/GMT or 19:30 SAST (apart from 1st Wednesday of the month which is a physical or virtual meeting).
- There is also a JS8Call digital mode bookmark but it is not often that operators are using this 2m frequency for JS8Call. It is useful for operators wanting to test though on JS8Call and see if this OpenWebRx is picking up the signal and decoding it.
- RTL-SDR 2m Voice
- Five voice radio repeater sites – you’ll hear bulletins Sundays 06:30 and 17:00 on the Kanonkop repeater, and on Wednesdays at 17:30 is the weekly HAMNET WC Bulletin on the Constantiaberg repeater on 145.700 MHz apart from 1st Wednesday of the month (all UTC/GMT times so add 2 hours for local SA times). To make tuning in to the HAMNET bulletin quicker, you can bookmark this browser link https://bit.ly/hamnetwcbulletin, and by just opening that bookmark, it will open OpenWebRx instantly on any device, already tuned to the HAMNET bulletin frequency. Please use the chat message feature to give your name or callsign if you are listening to the bulletin.
- If you watch the waterfall here, you may also see some simplex (direct radio to radio) conversations nearby on frequencies such as 145.250 MHz, 145.400 MHz, or 145.500 MHz. Hams will often use these frequencies if they are in direct range of each other instead of tying the repeaters up. If only one is in range of my OpenWebRx receiver, you may only hear one side of the conversation.
- RTL-SDR 70cm UHF Digital
- Helderberg and Cape Town DMR repeaters which are 24/7 International DMR Talk Group 91 on Slot 1, but sometimes you will also hear local hams talking on Slot 2.
- The International Space Station (ISS) on 438.800 MHz when it passes over. This is a cross-band repeater facility, so you’d hear hams from far away talking up to the ISS, and we’d hear them here on this frequency.
- Bottelary DMR/D-Star repeater on 438.300 MHz which switches between DMR and D-Star depending on which mode is using it. Note this repeater is being discontinued probably during 2024.
- Hawequa repeater on 438.800 MHz UHF – often used by our Afrikaans speaking hams.
- RTL-SDR 70cm UHF Repeaters
- Kanonkop UHF repeater – a voice repeater used on UHF band segment serving Cape Town area.
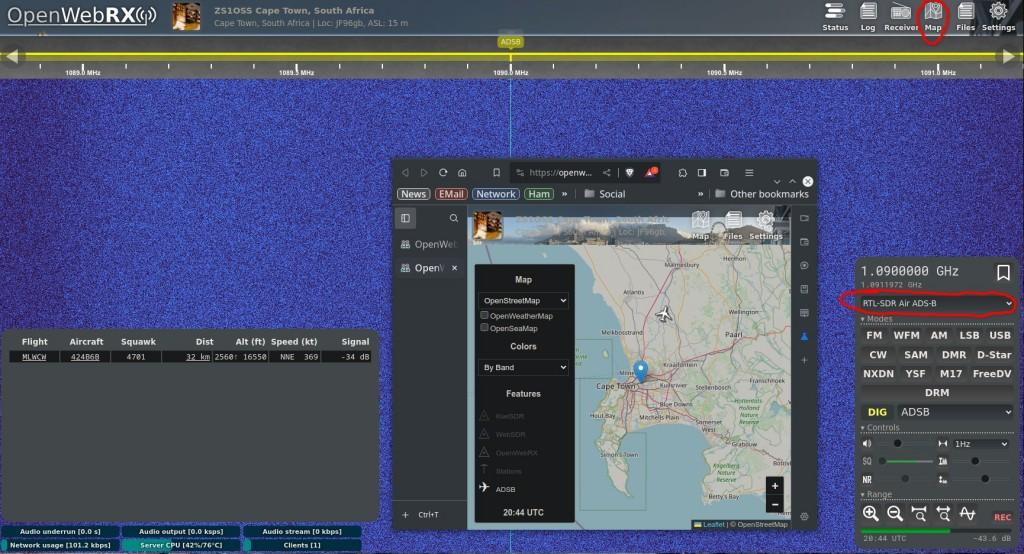
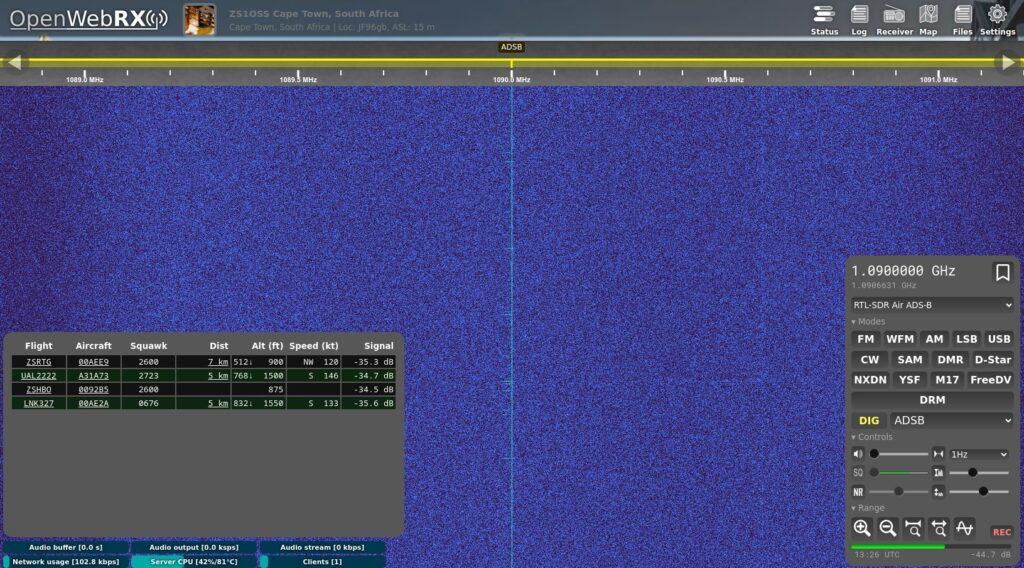
- RTL-SDR Air ADS-B
- It auto-tunes to the ADS-B frequency and will receive locator beacon information from planes within about a 40km radius. See the screenshot below. If you click on the Map button at the top right of the screen you should be able to view the location of the planes there. Clicking on a flight number will open the details in the FlightAware website.
- RTL-SDR Airband
- The Cape Town International Airport Tower and Approach frequencies are available here to listen to. Just click on the bookmarks to tune between the two.
- RTL-SDR Airband Locator
- Has bookmarks for the aircraft emergency locator beacon frequency, and also Cape Town International Airport Ground frequency.

Reference Links
OpenWebRx website: https://www.openwebrx.de/
Listen to my OpenWebRx station based in Cape Town, South Africa: https://openwebrx.gadgeteerza.co.za/
More detailed information about the user interface and controls at https://fms.komkon.org/OWRX/
Last updated: 2024-10-22
hamradio #amateurradio #openwebrx #radio #SDR #HAMNET #capetown #southafrica