What is Outpost?
Many know of Winlink and it could be said this is very similar, but it does more. Outpost Package Message Manager (Outpost PMM) is a PC-based (Windows native app but it runs under WINE on Linux, and on MacOS with Crossover too) that lets you send and receive packet messages with almost any Amateur Radio Bulletin Board System (BBS) or TNC Personal Mail Box. Outpost uses BBSs and PBBSs as mail drops where a user can leave a packet message for someone without the other person needing to be on line at that point in time. This page shows all the possible BBSs and PBBSs (personal Bulletin Board Systems) that Outpost is compatible with.
It will connect to a radio via either a hardware TNC (some radios such as Kenwood have a TNC internally) or a software app called SoundModem (or Direwolf). SoundModem can be configured via a single USB cable if the radio already has built-in sound card support, or otherwise via audio interface cables to the radio. In my case with the Icom IC-7100 all I needed was the single USB cable.
Once configured Outpost will manage all message handling between the PC and the BBS. Unlike commercial mail systems, BBS-based mail is transmitted unencrypted over the amateur radio bands. There is nothing private about it.
Outpost uses the AX.25 protocol at speeds of 1200 baud or faster. Outpost is compatible with many existing BBSs and PBBSs. It can use an existing TNC (or SoundModem/Direwolf) and usually also existing digital settings you have configured on your radio. So usually no need to change radio interface settings if you have used digital mode before.
Outpost is merely a client application on your computer for e-mail/messages to be sent/received to the server side (the BBS). In the case of using server side BBS software such as BPQ there is also additional functionality available, some of which requires other client software to access (see ‘What can I do with it?’ section below).
Why Outpost?
Outpost was created to support the packet communication needs of an ARES, RACES, or other emergency communications response team during a disaster or other activation where Amateur Radio is deployed. During an emergency, you may be required to pass lists of information or detailed instructions within an Operational Area to support Logistics, Operations, or Planning/Intel activities as required by a municipality’s Emergency Operations Center (EOC). Packet is ideal for this task. Outpost makes the job even easier by automating the manual interaction between you and the BBS, and having standardised forms for information input.
There is a technical comparison made of various Winlink client applications at the Winlink site, and which helps explain technically how the Outpost application differs from the Winlink application. A key difference is that no attachments can be added to Outpost (yet), but both Winlink and Outpost support P2P messaging, tactical addressing, and use of forms. Winlink is more limited in terms of functionality.
Outpost is freeware so it is completely free to use but you don’t have access to the source code nor any rights to modify it.
How is it different from JS8Call?
JS8Call is slower and specifically designed for long distance weak signal communication. Although JS8Call has Turbo mode it is still not as fast as Outpost with it’s up to 10Kb message stize. JS8Call client has no e-mail interface type functionality or formatted forms that are used.
JS8Call does live text transmission, or store for later retrieval, whilst Outpost is primarily store and retrieve to/from the central BBS but also intended for relaying and forwarding of messages.
JS8Call broadcasts to any station receiving, whilst Outpost is designed to connect to a central BBS.
Outpost would be able to transmit longer messages in a much quicker time compared to JS8Call over the equivalent short range. Outpost has e-mail type functionality such as delivery and read receipts, text formatting, marking a message as urgent, forwarding, etc.
The two protocols are different though and not interoperable. However the BBS server side being used in Cape Town (BPQ32) can have gateways for APRS and even Winlink, as well as live chat so there is richer additional functionailty. Regarding the BPQ BBS – there is a Windows version called BPQ32 as well as linux version called LinBPQ). BPQ is just one of many BBS systems that Outpost can connect to.
Can I add Attachments?
Outpost has a 10,000 character (10Kb) limit per message and attachments are not enabled yet. There is a workaround to include an attachment by converting it to UUencode but the entire message still needs to be under 10Kb. There are plans though to raise the size limits to align with Winlink, and to enable attachment functionality in future.
What can I do with it?
Note that Outpost is just a ‘mail/messaging’ client whilst some of the additional functionality below is provided by the BBS being connected to, and in the casde of Chat requires an additional client app or terminal screen.
- Primary use is going to be for sending or receiving text messages using a familiar PC-like mail client interface. There are three main message types:
- Private – addressed to a single (or a number of individual) user and are usually deleted after retrieval.
- NTS (National Traffic System) – requires special handling. In a nutshell it’s a system of relaying messages from one region to another. Its important during activations to be able to accurately forward messages to other regions, using a standardised format. More info here.
- Bulletins – retrievable by everyone and only the originator or Sysop can delete or expire it. Filters can be set to only retrieve specified bulletins.
- Chat – we need to explore the possibilities with this still as it runs from a different client application window. It supports a number of separate chat channels or “chatrooms”, called topics. It seems an application called BPQTerminal can be used via radio link, or an application called BPQTerminalTCP which will connect from a computer via a normal Internet TCP link. This should allow multi-node chat in realtime.
- Gateway with Winlink – this is a server side enablement and we must explore this still.
- Gateway with APRS – also server side and we must explore this option too. The BBS will then act as a APRS digipeater and IGate (Internet Gateway). An additional client application for Windows and Linux (and Raspberry Pi) provides functionality from the end user side on the computer with both mapping and APRS messaging.
Tactical calls will be operator neutral so that as operators change during an activation, the assignment name need not change. Multiple operators can share a specified tactical call sign. Outpost satisfies legal requiremnets by extending the addres frame of every frame to also include the station of origin’s call sign (Reference page 90 at https://www.outpostpm.org/docs/OutpostUG220.pdf).
A specific feature of Outpost is the use of standardised message forms that can be configured for your own tactical use. These forms will promptly for the correct information, and automation through scripting is also possible for further functionality. These scripting rules could first verify the formatting of information, pop up alerts, etc.
What components are required?
The basic components required from the end-user perspective are:
- PC with Outpost software. It can be downloaded here.
- A hardware TNC; or radio with built-in TNC; or SoundModem software on PC which emulates a TNC (or Direwolf TNC). Both SoundModem and Direwolf can run on Windows as well as Linux. SoundModem has a graphical interface whilst Direwolf has text file configuration files.
- USB or audio interface cables to connect PC to your radio (depends on your radio)
- Radio operates in data mode on designated frequency for the BBS you want to connect to
It works in this order: Outpost software talks to the TNC/SoundModem/Direwolf software, then the TNC/SoundModem/Direwolf software talks to the radio, and the radio of course connects via RF to the BBS (server maildrop). The sound will likely remind you of the old 1980’s dial-up modem sound when it gets going…
The SoundModem site has more details on how to configure connecting to the radio (and this is really the heart of the whole operation, to ensure this part works). This is very dependent on the choice of radio. It is well worth searching YouTube for your radio name plus “soundmodem” to see if there is any guidance there.
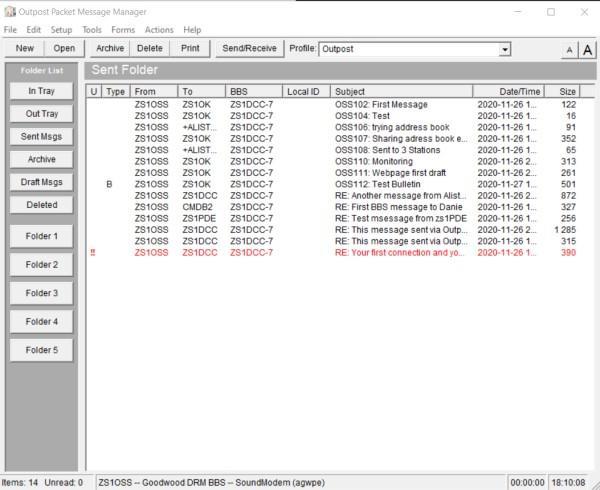
The Outpost website has a detailed guide on the configuration and use of the software. There is also an excellent YouTube guide here that can be followed for setup of SoundModem as well as Outpost. Note though for the BBS setup in Cape Town at Goodwood DRM there are some differences that need to be noted from the example in the video. See the section below specific to the Cape Town BBS. The quick start guide also contains some information on diagnosing errors in your setup.
More information here about hardware compatibility.
Goodwood DRM BBS Configuration
Thanks to Alister ZS1OK for setting up the Cape Town BBS and for providing the configuration guide for users. These are the BBS settings needed for connecting to this BBS and where applicable the time stamp is also mentioned where it relates to the YouTube guide video. The first part of that video is about SoundModem and all that information is relevant for Cape Town users. The times indicated in the table below relates to that specific point in time whilst watching the guide video.
| Time: | Guidelines |
|---|---|
| 6:10 | Start of Outpost installation |
| 8:10 | Start of Outpost Configuration – from first startup |
| 8:23 | User callsign: Your callsign User name: a username you login to the BBS (e.g. Joe Bloggs) Message ID Profile: any three letters or numbers so I chose OSS for myself but you could 1OK relating to your callsign |
| 8:42 | Don’t activate the Tactical callsign section for now. |
| 9:20 | If you use SoundModem this is quite correct. If you use a hardware TNC you will specify it here. Select the TNC button, etc. |
| 10:40 | Message Settings. For now, rather select the PRIVATE option. We will not be using the NTS option for now. The rest of the Message settings you can implement as shown, but not required. |
| 11:19 | Select PRIVATE rather than NTS |
| 11:24 | Receipts: While getting to know the system it is recommended that you select: Always request a Delivery Receipt. It’s your option whether you want to request a Read Receipt – probably also good to have while getting to know the system. |
| 12:18 |
BBS Configuration – Unique config for Cape Town BBS Name: ZS1DCC |
| 12:48 | Don’t select the NTS options as shown here. |
Set your radio to 144.575 MHz FM Digital mode with enough power to reach Goodwood DRM on simplex. A tip is to program a channel for it with these settings for quick use as the software does not push the settings to the radio (like JS8Call does).
For the Goodwood DRM BBS you can send a test message to ZS1DCC or ZS1DZ. You should also receive the welcome bulletin when connecting for the first time.
Configuration for Icom IC-7100
My radio was already configured for digital use for JS8Call so I made no changes at all to the USB connector settings. So these same settings on the radio should be applicable. The radio frequency must be set to whatever frequency the BBS is operating on, and ensure it is in FM-D (data mode) with squelch turned down.
The other thing to check is what ports are used on Windows OS to connect to the radio. In my case it was ports 9 and 10 as seen in the USB Devices list in Windows. Port 9 was the applicable one for CAT control. Choosing the incorrect one will just not transmit so no harm done if you make a mistake.
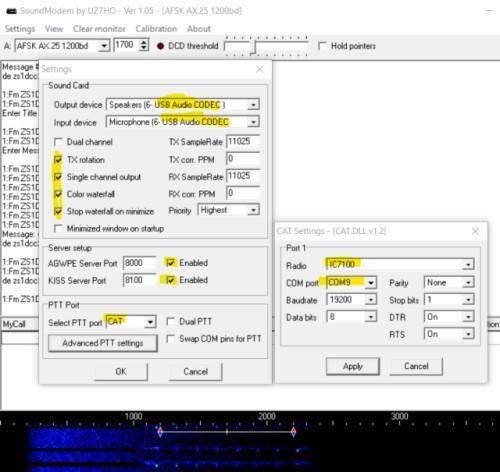
The settings above at the settings in SoundModem (Menu->Settings->Devices). You will note in yellow highlight that the Output/Input devices are set for the USB cable to the radio, and that for PTT port it was set to CAT. Clicking on the button to go to Advanced PTT settings brings up the smaller window on the right where you set the COM port to whichever one is applicable for your radio’s connection.
Way Forward
Well we’re still learning how this BBS operates and what other features we can explore so this page will certainly be expanding as we get there. Also if anyone sends me any screenshots or guides for other radios I will add them here too in their own section. My biggest challenge really was getting that CAT setup right with the correct COM port. With most radios if you already have set it up for digital use, you are probably 90% of your way to being ready to use Outpost.
On the radar now for the BBS side are:
- Inter-nodal relays to other BBSs and PBBSs (busy with this).
- Multi-node text chat.
- Possible gateway to Winlink
- Gateway with APRS mapping and messaging
Troubleshooting
Problem: Retrieval timing out without concluding
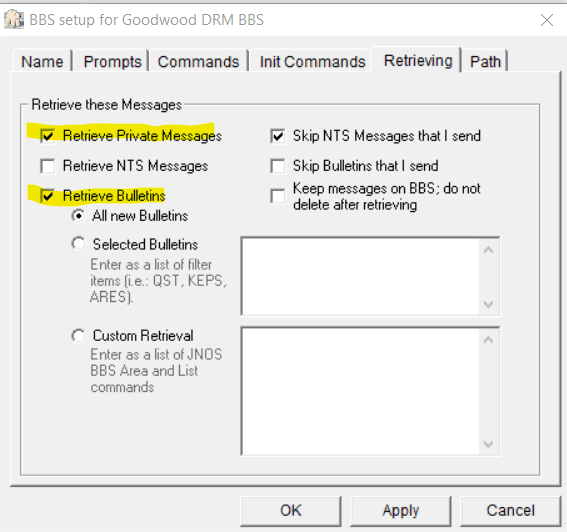
Repeated attempts to retrieve messages but never completes after about 40 messages after 6 minutes – this problem seemed to be created with having READ and DELIVERY receipts on by default. There may be some limitation we are not aware of on retrieval (apart from message size). Despite the Sysop deleting the messages on the BBS the problem was persisting and the Outpost client kept trying to download the full list (despite them being deleted).
Solution: The suspected solution maybe was turning off retrieval of any Private messages, and just connecting to retrieve bulletins. Then after that has completed successfully, re-enabling retrieval of Private messages. See screen shot below.
Problem: Too many simultaneous attempts to connect to BBS keeps frequency occupied
Solution: It is advisable to send/receive manually by pressing that option on the tollbar, rather than having scheduled send/receive. But if you want to have a scheduled send/receive rather set it for something like every 30 minutes.
Problem: Too many bulletins being received that are not relevant to me
Solution: Again in the BBS retrieval settings it is possible to switch from retrieving all new bulletins to just selected bulletins but then we need some standardised bulletin names, or at least a minimum of important ones everyone may need to receive.
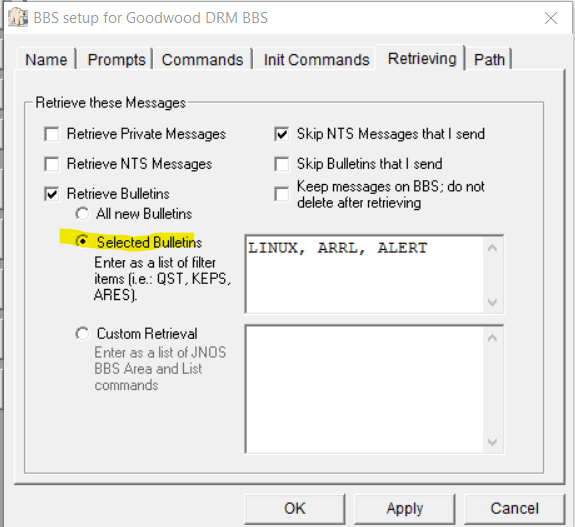
Problem: I just want to receive specific bulletins or bulletins timing out on retrieval
Solution: The solution is to set a filter for just a few (or specified bulletins) to retrieve. If it was a timeout issue you can then add a few more to the filter until they are all through. I see that bulletins have names such as ALL, ALERT, NEWS, TECH, LINUX, etc and although their fully qualified name is ARRL@WW you cannot seem to enter the suffix in the filter. So it may be that you cannot differentiate between local or remote bulletins, all called ALERT. We’ll have to check on this and maybe create special locally named bulletins for those who only want to receive one or two specific local bulletins. The following screenshot shows how a bulletin filter is set up in BBS retrieval settings.
Last Updated: 2020-12-02